SBAdmin Support
Need Help? We got you covered.
How to Install a TSM Node from Another Node’s Backup
Storix SBAdmin provides a simple method of installing a master backup onto one or more TSM nodes. SBAdmin for TSM is available the AIX, Linux and Solaris, and the information here applies to all operating systems.
By default, the user performing the system installation must know either the original node’s password or the TSM Administrator password to access the backup. These instructions will instruct you on how to create a system backup that any node can restore from without knowing the original node or administrator passwords.
Prerequisites
- Source and destinstation TSM nodes and TSM server configured
- TSM nodes can access TSM server over the network
- General knowledge of TSM password access policies
- General knowledge of TSM storage space
Configure TSM Nodes and Servers in SBAdmin
Although we assume the TSM node can already access the server using the TSM interface, you will need to configure the node and server within SBAdmin in order to perform SBAdmin backups.
1. Configure the TSM Server
Your TSM server must be defined with SBAdmin. If this has already been accomplished, continue to the next step. Otherwise, from the interface, select Configure > Servers. If you are using the Network Edition, use Configure > Servers > TSM Servers.
Refer to the SBAdmin user guide for instructions on any specific fields. The only important thing to note here is that the TSM Admin UserID and TSM Admin Password fields are required. You must enter a TSM administrator user ID and password for SBAdmin to be able to manager your TSM node backups.
Be sure to select the correct option for the PASSWORDAccess field. If you choose “Prompt”, then you will need to know each node’s password when configuring the nodes in the next step. Otherwise, “Generate” assumes the node already has access to the server.
2. Configure the TSM Backup Node
It is only necessary to define the node you will be backing up within SBAdmin. If the backup node has already been defined, continue to the next step.
From the SBadmin interface, select Configure > Clients. If you are using the Network Edition, you will also need to select the TSM Client Backup button when the client configuration screen appears.
Enter the NODEname of the TSM node as defined to the TSM server.
If you know the node’s password, enter it in the password field. If the TSM server is configured for PASSWORDAccess “generate” (as described above) and this client has accessed the server before, the node password will not be required.
Creating a Shared Backup
SBAdmin writes all TSM node backups to a filespace owned by the originating node. By default, these backups are only accessible to the original node, or when logging into the TSM server as the original node. It may also be desirable to create a “master” backup that any node can restore from without having to log on as the original node.
If, when installing from a backup, you know either the original node’s userame and password OR the TSM Administrator username and password, then you will have access to the original node’s backup, so this step is not necessary. On the other hand, if you want to install a new node from the original node’s backup, but don’t know the original node or administrator password, you can still can still access backups created under a shared filespace.
1. Change the Backup Profile Settings
To create a backup that any node can access for system recovery, you must alter the Backup Profile settings. This can be done for all backups which use a particular profile by selecting Configure > Backup Profiles, or you can change the option for a specific backup job using Configure > Backup Jobs (and selecting the View/Customize button under the Backup Profile settings).
When the Backup Profile Settings screen appears, change the option “TSM Backup Read Permission” to Any Client if you want any TSM node to be able to read from this backup. Otherwise, the default setting of Original Client (owner) will ensure only the original node has access (unless the TSM Administrator password is used).
If set to Any Client, any backup jobs created using this profile will be written to a shared filespace that any node can access.
2. Create and Run a System Backup Job
Use Configure > Backup Jobs to create a backup using a Full System Backup profile. If the backup is to be accessible by any node, then you should have changed the TSM Backup Read Permission option for the profile as described above.
Create System Installation Media
Use the option Utilities > Create/Manage Boot Media from the SBAdmin interface to create a bootable CDROM or network boot image for the client (node). You can accept the default settings in most cases. Refer to the SBAdmin System Recovery Guide for details.
1. Configure Client for Network Boot
If you created a network boot image in the previous step, then you must also select Configure > Network Boot/Install > Enable/Disable a Client for Network Boot/Install. This step is not needed when booting from a CDROM Image. Most defaults are sufficient, but be sure to enter the Hardware (Mac) Address of the new client if you will be performing a broadcast (PXE) boot.
2. Create a Bootable CDROM
If you created a bootable CDROM image, you may need to copy this (ISO) image to another system and write it to a CDROM. Instructions vary depending on the operating system of the CDRW drive.
Install the System
First, boot the system from the installation media. When the Main Menu appears, you will need to select the TSM server and backup to install from:
1. Select Set Install Server or Device
2. Select Use TSM Server to display the Set TSM Install Configuration options
3. Select Set or Change Network Configuration
If you booted from the network and are installing from the same server you booted from, this step is not necessary. If you booted from other media or are installing from a different server, change the settings here to set the client and server IP address. Return to the Set TSM Install Configuration options.
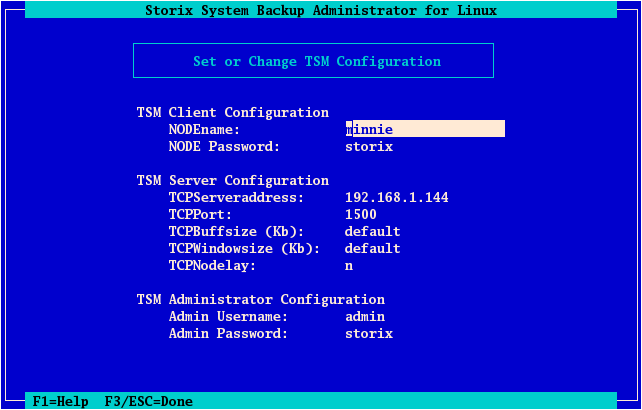
4. Select Set or Change TSM Configuration. A screen will appear similar to the following:
Complete the entries in this screen using one of the following:
- If you know the nodename and password of the original node the backup was created from, you can enter it in the NODEname ande NODE Password fields. In this case, you will be logged onto the TSM server as the original node.
- If you know the TSM administrator username and password, you can enter them in the Admin Username and Admin Password fields. In this case, you must also enter the nodename of the original backup node in the NODEname field, but the NODE Password field is not required.
- If you do not know the TSM administrator username/password nor the original node password, you can enter your own nodename and password in the NODEname and NODE Password fields. In this case, you will be logged into the TSM server under your own node name and can only access backups written to shared filespaces (see Creating a Shared Backup).Return to the Set TSM Install Configuration options.
1. Choose Select Remote TSM Backup. You must have first entered a nodename as described in #4 above. If so, you will receive a prompt such as:
Select backups created (owned) by nodename mickey? (y/n)
Note that “mickey” is hte nodname you selected to use to connect to the server, but not necessarily the original owner of the backup. If hte backup was created from “mickey”, enter “y” here. Otherwise, select “n”, then you are prompted for the original node name of the owner of the backup.
2. A list of system backup will appear that were created from the nodename selected above. Select a backup from the list.
After selecting the backup, press ESC to return to the Main Menu and select to Install the System With Current Settings. If there are differences in hardware between the old and new nodes that require user intervention, you will be required to make additional changes to the system configuration. Otherwise, the system installation will proceed without further user action.
Post Installation
After the installation completes, the new node will be a clone of the original node. The SBAdmin system recovery process will automatically replace the new node’s network settings with those used during the installation process to avoid any network conflicts. However, the TSM node settings (i.e. dsm.sys and dsm.opt files) or the original node will still be in place on the new system. This will require you to alter this information to apply the new node settings if this system is to continue to operate in the TSM environment.
Conclusion
With the ability to perform full system backups and bare-metal recovery to a TSM server, system recovery, cloning and hardware migration is greatly simplified. A single “master” backup of a node can be used to install many other nodes, even simultaneouely, with no external boot or installation media needed by the new node.