SBAdmin Support
Need Help? We got you covered.
How to clone a Linux x86 system into a VMware virtual machine (SBAdmin v7)
Storix SBAdmin allows for cloning a system to dissimilar hardware using Adaptable System Recovery (ASR). One advantage to this is being able to take a system installed on physical hardware and migrate it into a VMware virtual machine.
Prerequisites
- VMware Server or ESX Server
- A system with SBAdmin Network Edition installed with a configured server
- A Linux x86 system with SBAdmin Client/Server installed and configured as a client
- General knowledge of VMware and Linux kernel modules
Cloning a Linux x86 system from real hardware to VMware virtual guest
The SBAdmin process for cloning and performing system recovery are the same. Both will use SBAdmin Adaptable System Recovery (ASR) which provides system installation, from bare-metal, onto dissimilar or virtual hardware. The ASR process requires 2 items:
SBAdmin Boot Media
Creating Full System Backup
The Full System Backup job will contain all of the storage/system information necessary to rebuild it at the time of cloning/recovery as well as the data to be restored.
To create a Full System Backup job select Configure > Backup Jobs from the GUI or Web Interface. Many of the options for configuring a backup job will not be discussed here because we are only concerned with configuring a full system backup.
Enter a Job ID to identify the backup job. Select the Server Name of the server the backup will be written to. Select a Backup Profile that is of type “full system” (ie. default profile FULL_SYSTEM). Select the Client the you wish to backup. Select the Backup Device where the backup will be stored on the server. Click Save to update the job information or Run Now to start the backup.
Creating Boot Media
Network boot (PXE)
Hard disk
We will be using a CDROM ISO image. For further information about creating SBAdmin boot media please see the SBAdmin Linux Recovery Guide.When cloning to different hardware it is necessary to know what kernel modules need to be loaded in order to access system hard disks, and network adapters. VMware guests typically use either the BusLogic or LSI modules for SCSI disks, and the pcnet32 module for network adapters.
To create CDROM ISO boot media select Utilities > Create/Manage Boot Media > CDROM Boot Images from the SBAdmin GUI or Web Interface.
Select the Boot Server Name, which indicates on which system the ISO will be stored. You may also choose “Store on Client” if you would like the image to remain on the client. Enter the CDROM Boot Image Name which will identify this ISO image. Select the Client Name that will be used to create the boot media. The window will look similar to the following.
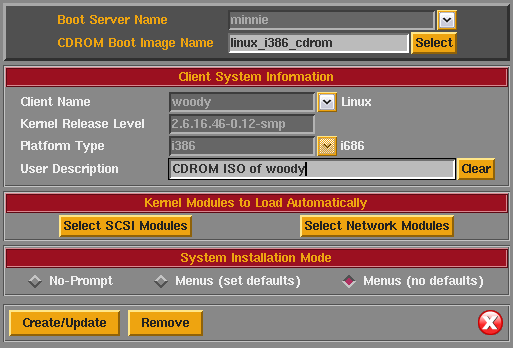
To ensure that the proper disk and network device modules/drivers are loaded by default when booting the target system with the boot media, further configuration is necessary. Note that even without selecting to load the modules by default you would be able to manually load them from the system recovery menus.
Press the Select SCSI Modules button. A list of modules available on the client system for the running kernel will presented. Select either the BusLogic or mptspi module depending on what type of virtual disks the target VMware guest is using.
Press the Select Network Modules button and ensure the pcnet32 module is selected to be loaded on boot.
Select Create/Update to create the ISO image.
At this point the ISO image can be burned to a disc or directly transferred to the VMware server and used as a virtual CDROM to boot the VMware guest.
Booting the Virtual Machine
While SBAdmin is capable to cloning to disks of any number or size, it will be helpful to you if the VMware guest system has disks of equal or greater size than the client that was used for the backup. If the disks are smaller you will be required to make additional changes during the system recovery process.
Boot the target VMware guest using the SBAdmin CDROM boot media by using the physical hardware or by using the ISO image itself (VMware documentation should provide you with steps to configure either method).
Once the virtual machine has booted you will be presented with the SBAdmin system installation menus.
Restoring from the Backup
We now will select the backup we wish to clone from. Because we are restoring over the network, we must first configure the network. Select Change Install Server or Device then Set or Change Network Configuration. Enter the appropriate information for your network environment and press ESC or F3.
Next, select the appropriate device where the backup was stored on the remote backup server. For example, if the backup was written to a directory device on the server select Select Remote Disk Backup File. Choose the backup that you would like to restore and use ESC/F3 to return to the main menu.
Choose Install the System with Current Settings. The installation process will check that the storage configuration will fit onto the new disks and you will be prompted to start the installation.
When the installation process has completed you should type “exit” to reboot the system. Upon reboot of the virtual machine, the restored operating system will take the network configuration used during the install (IP and hostname). This is to prevent conflicting IP addresses and hostnames on the network.
For more information SBAdmin Linux System Recovery SBAdmin Linux Recovery Guide.