SBAdmin Support
Need Help? We got you covered.
How to Migrate Linux Disk Partitions to LVM
This how-to will assist in migrating Linux filesystems build on partitions to filesystems built on logical volumes. To accomplish this, you will use SBAdmin’s Adapatble System Recovery (ASR) features to alter the storage configuration of the system using Logical Volume Management (LVM) and restore the entire system onto this new configuration.
Prerequisites
- Linux kernel levels 2.4 and above
- Linux LVM tools 0.9-rc4 and above
- SBAdmin Client/Server installed on the client system
- SBAdmin Network Edition with backup server and device configured
Migrate Linux storage using LVM
Determine Space Requirements
Often times, users want to migrate their storage because the system was originally installed on a single filesystem built onto a partition. In this how-to, we will also break up the root filesystem into multiple filesystems for greater flexibility and performance. This storage configuration also makes the system less vunerable to catastrophic failure.
To ensure we create each filesystem with enough space, we need to document how much space is being taken up.
# cd /
# du -sh *
30M boot
4.1M bin
9.8M etc
3.5G home
129M opt
7.1M sbin
212M tmp
2.6G usr
551M var
To get the overall size of the root filesystem, use the df command. Then you can determine how much space you want to dedicate to each new filesystem. For this example we will use the following settings based on the space used.
/ 1.5G
/boot 64M
/home 4G
/usr 3G
/var 1G
/opt 256M
Because the filesystems will be built on logical volumes, you will be able to extend the LVs and grow the filesystems as needed. This will provide more efficient use of your disk space and greater flexibility in case you want to create new filesystems or add additional disks.
Create the backup and boot media
- Create a backup using a full system backup type profile (ie. FULL_SYSTEM) to tape, remote server, or external disk.
- Create SBAdmin installation boot media. (For more information see the SBAdmin Linux System Recovery Guide)
Boot the system and select the backup
Power-on the system and press the key combination to enter the BIOS or a boot menu to select the device to boot your installation boot media. (CDROM, network adapter, external disk/USB drive)
Once the system is booted you will be presented with the Installation Menu
( Main Menu )
Update the partition table information
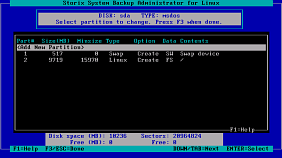
( Edit Partition Table )
Your configuration may differ, but in this case, there are two partitions. One partition is used for swap and the other partition is used for the root (/) filesystem. The partitions are taking up the entire space on the disk.
When we finish, we will have three partitions – /boot (sda1) swap (sda2) and the physical volume (PV) for the volume group (VG) (sda3).
- The first step is to add two additional partitions to be used by the /boot filesystem.
- Select Add New Partition and add one 54MB partition of type 83 at the beginning of the disk (sda1) and one 54MB at the end of the disk (sda5). This becomes sda5 due to the need for an extented partition. Don’t worry, we will still end up with 3 partitions in the end.
- Select the partition currently being used for the root filesystem (sda3).
- Change the parition type from 83 (Linux) to 8e (Linux LVM) and reduce the size by 54MB.
- Press F3/ESC once to return back to the Change Installation Settings Menu. (You can ignore the errors you see regarding the disk space usage – for now)
- We need to move the root filesystem off of its current partition (sda3) and move it to the last partition (sda5).CONFUSION WARNING!!
SBAdmin has a safety precaution that prevents you from removing or repurposing the device the root filesystem is using. We need to move the root filesystem off to another partition temporarily before moving it to a logical volume. We will use the sda5 temporarily, then move it to a logical volume once we have created it. - Select Add or Change Filesystems
- Select the root filesystem and change the “Device” to the last partition (sda5). Press F3/ESC to save the configuration.
- Select Add New and create a new /boot filesystem on the first partition (sda1). Press F3/ESC to save the configuration.
Now we are ready to set up our LVM environment.
Setup Logical Volume Management
- From the Change Installation Settings Menu, select Logical Volume Management
- Select Add or Remove Physical Volumes
- Use the up/down arrows and press [enter] to select the partition previously used by the root filesystem (sda3). Press F3/ESC once to return to the LVM menu.
- Select Add or Change Volume Groups, select Add New
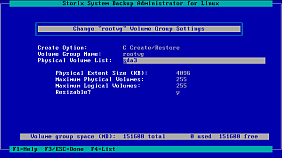
( Create/Edit Volume Group ) - From this screen you configure your volume group. In this example we will use the name “rootvg”. This is the name typically used on AIX and HP-UX systems. Press F3/ESC when finished. Also, we will use the physical volume sda3.
- Select Add or Change Logical Volumes, select Add New
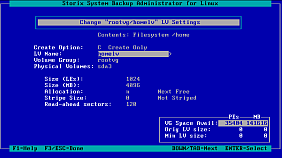
( Create/Edit Logical Volumes ) - From this screen you configure your logical volumes. In this example, create the following logical volumes:
Logical Volume Size in MB Physical Volume rootlv 1536 sda3 homelv 4096 sda3 usrlv 3072 sda3 varlv 1024 sda3 optlv 256 sda3 It is a good idea to name the logical volumes similar to the fileysystems they will contain. For some reason Linux distributions like to name them lv01, lv02, etc. This is harder to keep track.
- Press F3/ESC twice to return to the Change Installation Menu.
Change/Create Filesystems
- From the Change Installation Settings Menu, select Add/Change Filesystem
- From this screen you can create and configure each new filesystem. You can use the defaults or make changes such as the filesystem type. Create the following filesystems:
Name Device /boot sda1 /home homelv /usr usrlv /var varlv /opt optlv - Once you have created each of the above filesystems, select the root filesystem. Edit the device used from the 64M partitions you recently created to the new “rootlv” logical volume. Press F3/ESC twice to return to the Change Installation Settings Menu. (You can ignore the warning about space because we will be spreading the data across multiple filesystems.)
Final Cleanup and Restore
As I stated before, we will remove the temporary partition we created. From the Change Installation Settings Menu, select Change Partition Tables
Select to remove the last partition (sda5). Once it is removed you should have three partitions.
| Partition | Type | Contents |
|---|---|---|
| sda1 | Linux | /boot |
| sda2 | Swap | Swap Device |
| sda3 | LVM | VG:rootvg |
Conclusion
We just went through the simple steps of splitting up a single root filesystem into multiple fileysystems using LVM. You can also use this process to spread a system across multiple disks, configure software RAID, change filesystem types, or move from internal disks to SAN attached storage.