SBAdmin Support
Need Help? We got you covered.
How to migrate UFS root filesystem to ZFS root filesystem
The purpose of this how-to is to describe the steps necessary to migrate a Solaris system with root (/) on UFS to root on ZFS. To accomplish this, you will use SBAdmin’s Adaptable System Recovery (ASR) to alter the storage configuration of the system and restore the entire system onto the new configuration.
Prerequisites
- SBAdmin version 7.1 and later
- SBAdmin Full System backup of Solaris 10 update 6 (and later) client
- SBAdmin System Installation Boot Media created by Solaris 10 update 6 (and later) client
Migrate to root on ZFS
Determine which filesystems to migrate
# df -hF ufs
Filesystem size used avail capacity Mounted on
/dev/dsk/c1t0d0s0 594M 391M 144M 74% /
/dev/dsk/c1t0d0s7 1.8G 1.9M 1.8G 1% /export/home
As you can see, our / filesystem is almost out of space, but there is significant space in the /export/home filesystem that is available. By using ZFS, each of these filesystems can utilize the same pool of space. Therefore, we will be migrating the / and /export/home filesystems to ZFS.
Also, our swap space is built on a slice. Therefore, we will migrate swap to a ZFS volume as well.
# swap -l
swapfile dev swaplo blocks free
/dev/dsk/c1t0d0s1 30,1 8 1048568 1048568
Boot client system using SBAdmin system installation boot media
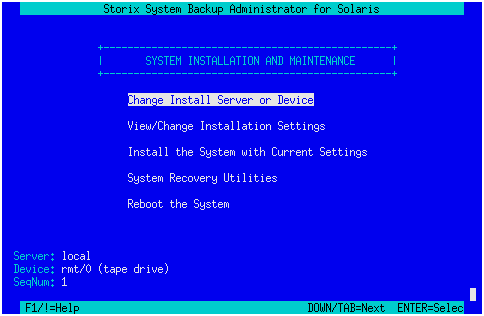
Regardless of the type of SBAdmin boot media you selected, each will bring you to the same Storix System Installation and Maintenance menus. These menus will be used to perform the storage migration.
This is the main menu:
Select backup to restore from
Selecting Change Install Server or Device will allow you to select a backup or a device to be used for the restore. For the purposes of this article we will be restoring from a local tape device (rmt/0), but you may also restore from a local disk device or a remote tape or disk device.
Once you have selected the backup to restore from, press ESC or F3 a few times until you return back to the main menu.
Create slice to be used by ZFS pool
In order to create ZFS filesystems and volumes, we must first create a ZFS pool. A ZFS pool is a collection of slices, or a single slice, that will be used to allocate storage to its underlying filesystems and volumes. The ZFS pool that we will create will be using the slice space previously dedicated to the / and /export/home filesystems, as well as the swap device.
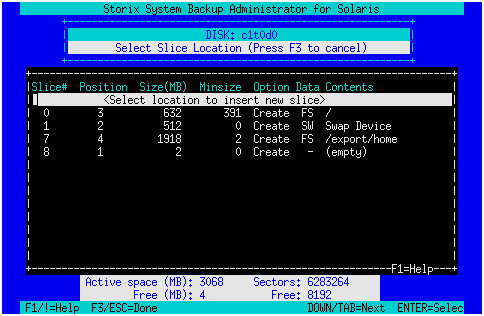
Selecting View/Change Installation Settings and Change Slice Tables will present you with a list of disks on the system. Select the disk that you wish to use for the ZFS pool. In our case, we have only one disk “c1t0d0” so we select it.
We are then presented with a screen that displays the slices as they are currently configured.

Our current slice table shows us that / is built on slice 0 (632 MB), swap is built on slice 1 (512 MB), and /export/home is built on slice 7 (1918 MB). These 3 slices combined are 3062 MB in size, so we will create a new slice of that size. Note that by creating a new slice we are exceeding the allowable size for this disk. We will fix this later by removing the unused slices after the migration is completed.
To create a new slice select Add new slice and then move to the slice above where you wish to insert the new slice. We want this new slice to be slice 0 so we press ENTER at the beginning of the table.
We are presented with a new window where we will specify the size of the new slice. In our case, the size of slice 0 will be the combined size of the slices we wish to migrate from. So we move down to the Size(MB) field and enter “3062” as the size in MB we wish to create the new slice.

Pressing ESC will add our new slice into the current slice table.
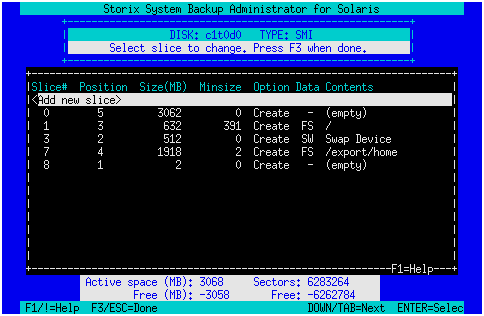
We now have a slice (c1t0d0s0) that we may use as a virtual device for our ZFS pool. Press ESC to return to the previous menu. Note that you may receive a message indicating that the slices currently configured exceed the size of the disk. If so, enter y to return to the previous menu without making further changes. As mentioned before, we will fix this once the migration is complete.
Create new ZFS pool
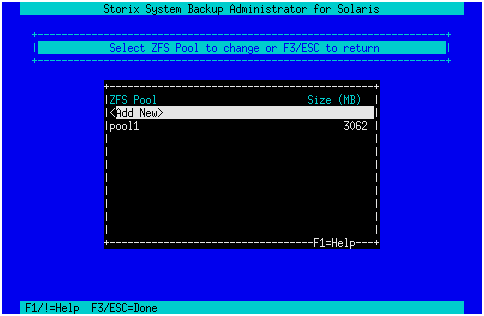
We are now ready to create our new ZFS pool. Select ZFS Filesystem/Volume Manager and then ZFS Pools / Virtual Devices. This will present us with the following window which displays all currently configured ZFS pools (in our case none):
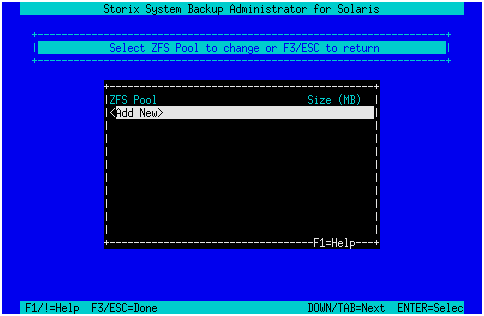
We select Add New to create a new ZFS pool and are presented with a window that will allow us to configure the virtual devices for the pool.
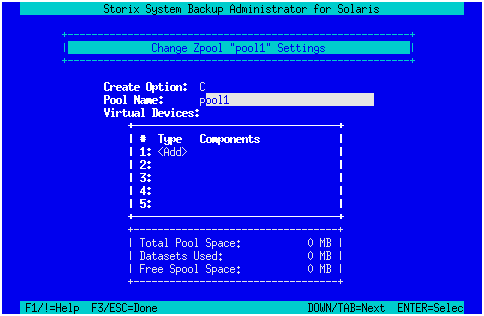
The name of the pool will be automatically generated (“pool1” here) or you may change it to something more descriptive. We will leave it as “pool1”.
As you can see there are currently no virtual devices assigned to the pool and no pool space available. We will add our new slice (c1t0d0s0) as a virtual device to allocate storage space to the pool. Move down to the line representing virtual device #1 and select Add.
A new window will appear which will be used to change the settings for virtual device #1.
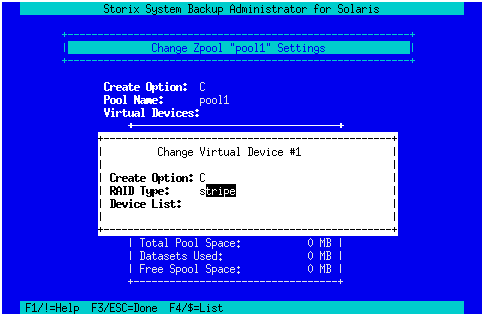
We will leave the Create Option set to “C” (create). For the purposes of this article, we have only 1 slice and will therefore use “stripe” as the RAID Type. However, if you had multiple slices to apply to this virtual device you could select to use “mirror”, “raidz1”, or “raidz2” by pressing F4 in the RAID Type field.
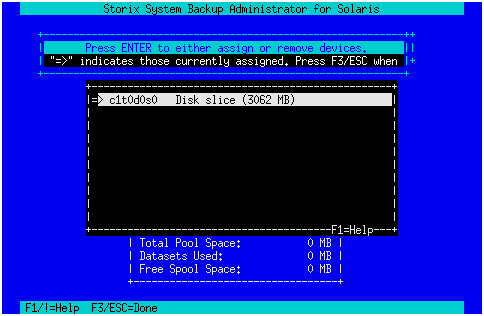
We currently have no devices assigned to this virtual device. To add a device, move down to the Device List field and press F4. A list of available slices will appear. Highlight the slices you wish to apply to this virtual device and press ENTER. A “=>” will indicate those slices that are currently assigned. In our case, we will be assigning slice c1t0d0s0.
After selecting the slice(s) you wish to assign to the new pool, press ESC twice to return to the Zpool settings window.
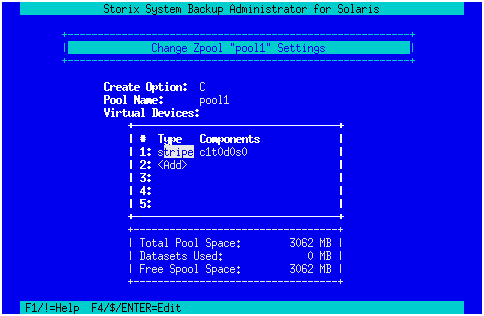
We now see that we have 1 virtual device configured for pool1 and the total pool space is 3062 MB.
Press ESC and you will now see that we have a new ZFS pool configured.
Press ESC twice more and you will return to the Change Installation Settings menu.
Migrate UFS filesystems to ZFS
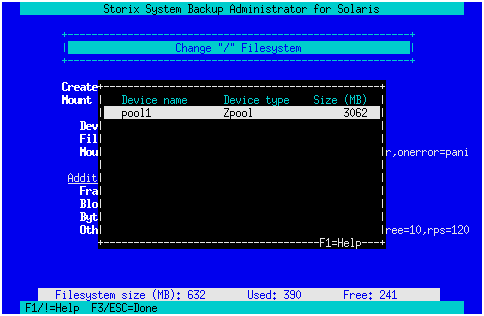
Now that we have a ZFS pool, we can now migrate our UFS filesystems to a ZFS filesystem. Select Change Solaris Filesystems and you will be presented with a list of all non-ZFS filesystems that will be created as part of the system recovery.
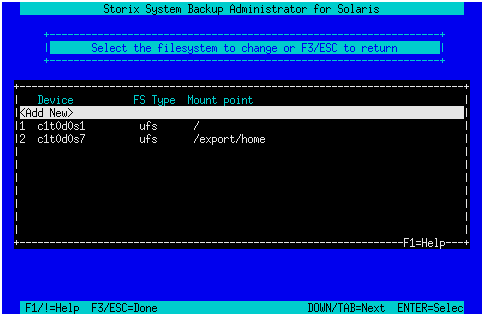
We see that the filesystems we will migrate (/ and /export/home) are currently UFS filesystems and built on slices. We will first migrate the / filesystem.
Move the cursor down until the / filesystem is highlighted and press ENTER. This will present you with a new window which will allow you to view and change characteristics of the filesystem, including the fileystem type.
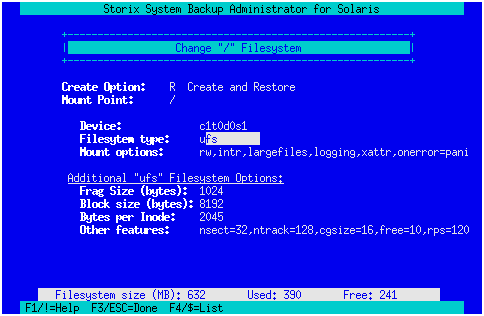
In order to migrate the / filesystem to ZFS we must change the filesystem type. Move the cursor down until the Filesystem Type field is highlighted and press F4 to list the available filesystems types. Note that the list will only include those fileystems that are supported by both the backup and the boot media.
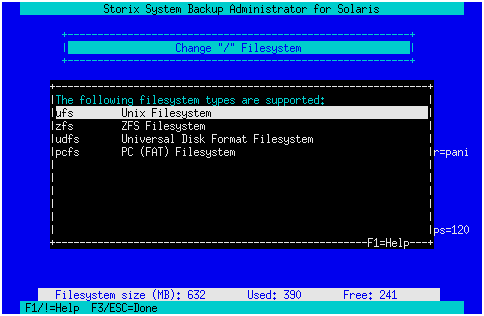
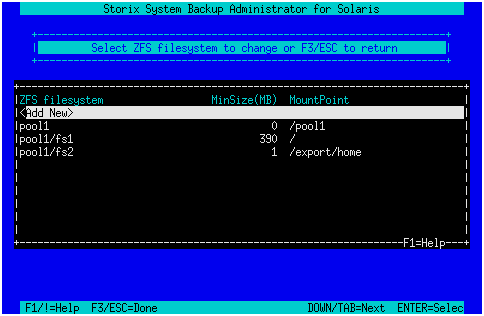
Move the cursor down until zfs is highlighted and press ENTER. You will be presented with a note indicating that because you are changing to ZFS you must select a ZFS pool to create the filesystem in. Press ENTER to continue and you are then presented with a list of configured ZFS pools to select from.
In our scenario we only have one pool “pool1”. Selecting it will present us with another note indicating that the filesystem has been migrated to ZFS and provide us with the ZFS dataset name. The note will also tell us that if we wish to make changes to the attributes and properties of this dataset, these changes should be performed from the ZFS Filesystem/Volume Manager menu option.
We press ENTER to continue which returns us to the Change Installation Settings Menu.
Repeat this step for the /export/home filesystem and both of our filesystems will be migrated to ZFS.
After both filesystems have been migrated, select the ZFS Filesystem/Volume Manager menu option and then ZFS Filesystems to display our currently configured ZFS filesystems including those we just migrated.
If you wish to make any changes to the attributes or properties of the filesystem, you may do so at this point by highlighting the filesystem and pressing ENTER. For the purposes of this article, we will not be making any changes so we can press ESC to return to the previous menu.
Migrate swap to ZFS
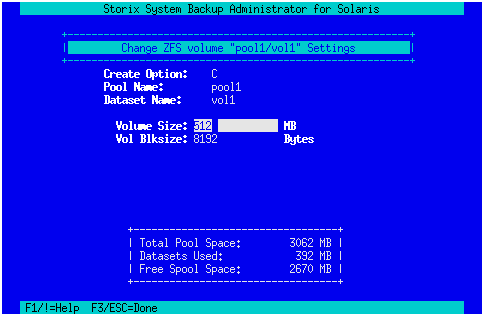
Now we will create a ZFS volume that will be used as a swap device. Select the ZFS Volumes menu option which displays all currently conifgured volumes. Select Add New to create a new volume.
A new window will appear where we will configure the new volume. We will use the default volume name (vol1 in this case) but change the Volume Size to 512 MB.
We press ESC and can see the newly created volume.
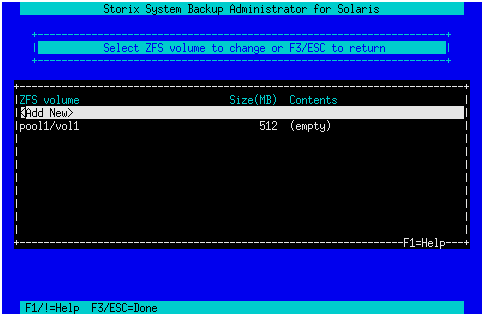
Now we must configure the volume to be used as a swap device. Press ESC to return to the Change Installation Settings menu and select Change Swap Devices. We will be presented with a window that displays all devices currently conifgured as swap devices and those that are available to be configured as a swap device. Currently c1t0d0s3 is configured for swap.
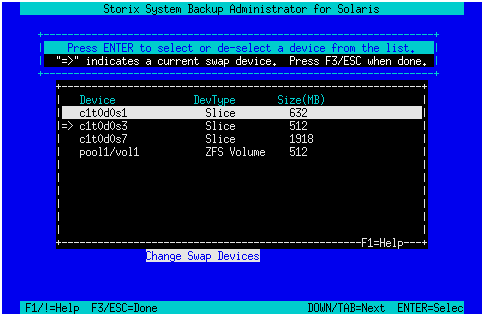
We no longer want to use c1t0d0s3 as swap so we move to the line for the device and press ENTER. We want to use volume pool1/vol1 as swap so we move to the line for the device and press ENTER.
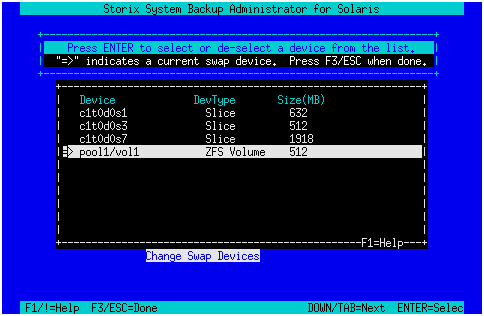
Press ESC to return to the Change Installation Settings menu.
Remove unused slices
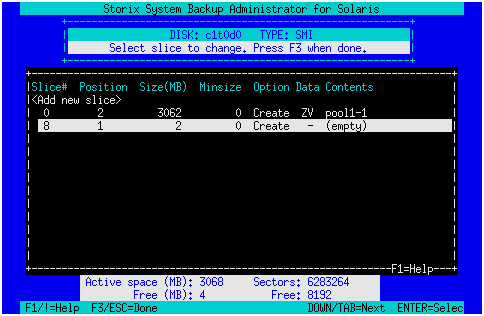
If you remember, the changes we made to our slice table caused the total amount of space used by slices to exceed the size of the disk. We will fix this now by removing slices we no longer need. Select Change Slice Tables from the menu and select the disk we wish to change, “c1t0d0” in our case.
We will be presented with a window that shows our current slice table.
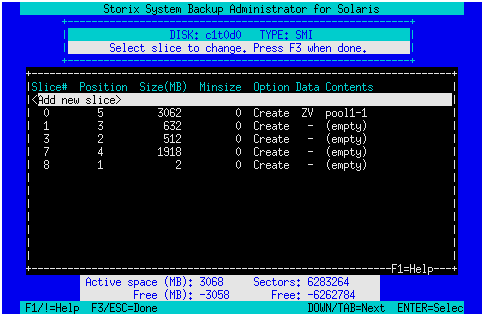
Notice that the slice we previously created (slice 0) now indicates that it contains ZFS pool “pool1” and represents virtual device #1 (pool1-1). Also notice that the slices previously used by / (slice 1), swap (slice 3), and /export/home (slice 7) are no longer used. Removing the unused slices will free up designated space and allow us to perform the migration.
Move the cursor until slice 1 is highlighted and press ENTER.
You will be presented with the following window:
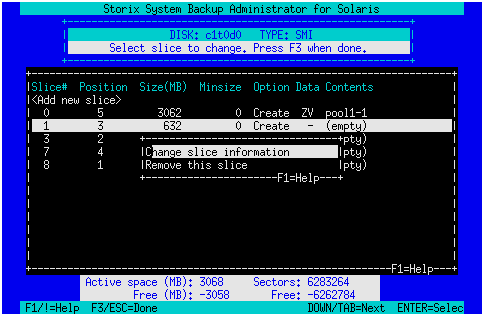
We no longer want this slice so we select Remove this slice and the slice is removed from our current slice table. Repeat this step for slice 3 and slice 7. Your slice table will now fit onto the disk.
Press ESC twice to return to the main menu.
At this point, you have completed the process of migrating the UFS filesystems to ZFS. You may select to Install the System with Current Settings, which will re-install the system, or you may select to make further changes.